Microsoft provides Outlook email clients for both Windows and Mac platforms, as is well known. Microsoft Outlook and Mac Outlook are used to support communication with Exchange. Identical user interface and functionality can be found in Outlook for Windows and Outlook for Mac. The file format that each of these email clients uses to store data essentially distinguishes them from one another. While Outlook for Windows keeps its data in PST files, Outlook for Mac stores its data in OLM files. Additionally, Outlook for Mac loses several of the features that MS Outlook has.
Reason for Mac Outlook OLM to PST File Conversion
Well, OLM files are not supported by Outlook for Windows due to the various file types. Now, if you want to open the OLM file to PST, you must convert it first. The OLM file has to be converted to Outlook PST.
Users convert OLM files to PST files for a variety of reasons. Understanding these causes is crucial if you want to have a thorough understanding of the entire procedure. And in this part, we’ll go through a few of the typical situations that call for OLM to Outlook PST conversion, including:
- Switching from a Windows environment to a Mac environment is the primary driver behind this conversion.
- You must also convert the OLM data to PST if you are temporarily relocating.
Read More: Convert OLM to PST
How to Manually Convert Mailbox from Mac Files to Outlook Windows?
Users can manually convert OLM to PST using the four procedures listed below. Carefully follow each step.
Step 1: open an IMAP account.
- Log into your Gmail account.
- Select Settings.
- Click the POP/IMAP tab and then Forwarding.
- Turn on IMAP now, and then click Save Changes.
Step 2: Configure the Mac Outlook with an IMAP Account
- Open Outlook on your macOS and log in.
- Click on Accounts in the Tool section.
- Select Email now, and then enter your email credentials.
- Enter the IMAP server’s information and choose SSL connection using port 465 and SMTP number.
- Select the Add Account button.
Step 3: IMAP Export for Mac Outlook Emails
- Select all of the emails you wish to export in Mac Outlook.
- Move Copy to folder by performing a right-click on the folder.
- Select a copy from the IMAP folder by navigating there.
- IMAP folder updates through the Send/Receive button.
- Your IMAP account has now been updated with all of your OLM email messages.
Step 4: Configure Windows Outlook for the same IMAP account.
- Select Mail > Email Accounts > New in the Control Panel.
- Select manual server configuration.
- Click next after selecting IMAP/POP settings.
- Fill in the IMAP account information, including the incoming and outgoing servers.
- Select More Setting.
- Select the advanced tab and type 993 as the IMAP server’s port number.
- Next, choose SSL connection.
- In the SMTP server, enter port 465, and then choose SSL connection.
The drawbacks
- Time-consuming and lengthy procedure.
- You need to have solid technical expertise.
- Risk of data loss or corruption as a result of human mistakes.
Trusted Solution to Convert Mac Outlook to Windows Outlook without Outlook
As we’ve seen, the process mentioned above is time-consuming since, using the manual technique, each of the four activities listed above must be completed. You can thus use the OLM to PST File Converter Tool in this situation. You must carry out the steps listed above in order to use this application, which provides you the straight option to Switch OLM Mailbox from Mac to Windows PST file format. This software is support all Mac and Windows OS versions.
The steps needed to export OLM to an Outlook PST file are as follows:-
- Get the Mac and Windows version of the OLM to PST Converter tool.
- Click the Browse button after selecting the “Add OLM File” option.

- View a free preview of the whole property list.
- Select an output option. Like – All Notes, Mail, Calendar, Contacts, and Tasks.
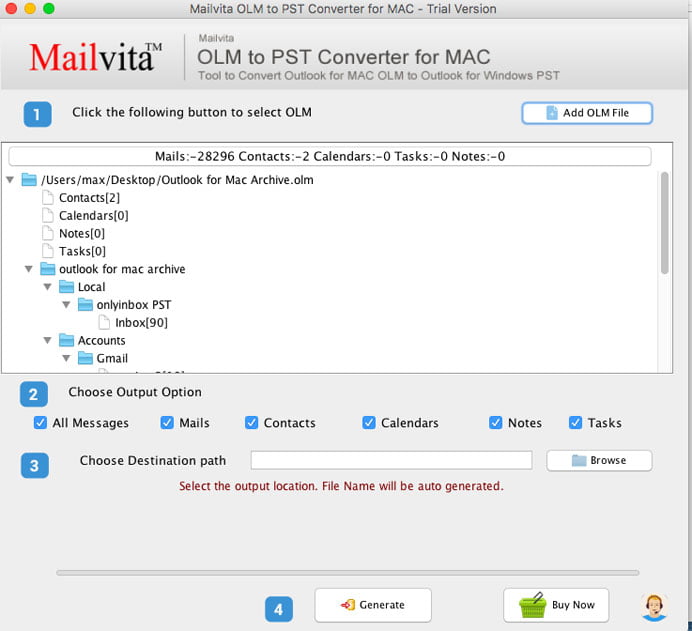
- After choosing your location, click the Browse button.
- Quickly press the “Generate” button. Start the application’s conversion.

Final Words
We know that converting one file type to another might be challenging. Now, the factors that contributed to the OLM to PST conversion were quite important. The two best methods for Switch OLM Mailbox from Mac to Windows PST file format have been covered in this article. Therefore, it is up to you to select the best strategy for you. Remember that picking the wrong one might really make things difficult for you. Always choose the wise course of action, say users.